Nodejs 入门-NPM包管理与Devtools调试
NPM 源切换
注意如果是私有模块在 NPM 官方的,则必须切换为官方源,否则会出现 404 错误。
npm config get registry
# http://registry.npmjs.org/
npm config set registry=https://registry.npmmirror.com:::tips
在 npm 私有的时候 需要切换回 npm 源
:::
npm config set registry=http://registry.npmjs.org

# 如果不想全局设置,执行 npm 命令时也可通过参数传递镜像地址
npm i module --registry=https://registry.npmmirror.com
开始项目
初始化项目
控制台执行 npm init,根据提示输入信息,会生成一个 package.json 文件,如下所示:
{
  "name": "test", // 项目名称
  "version": "1.0.0", // 版本号
  "description": "", // 描述
  "main": "index.js", // 入口文件,默认 index.js
  "scripts": {
    "test": "echo \"Error: no test specified\" && exit 1"
  },
  "author": "May", // 作者
  "license": "ISC"
}
安装模块
安装 npm 模块,例如我们安装一个 moment 模块,执行以下命令。
npm install moment -S
# or
npm i moment --save
安装后,会生成一个新的目录 node_modules 这是用来存放我们所安装的模块,另外 package.json 也会发生变化多了一个 dependencies 对象,这个是用来存储我们的模块版本信息。
"dependencies": {
  "moment": "^2.24.0"
}
NPM 注册登录
# 注册账号
$ npm adduser
Username: your name
Password: your password
Email: (this IS public) your email

# 查看当前用户
npm whoami
# 登录
npm login
私有模块
如果是公司团队或者个人项目的私有 npm 包,进行发布的时候要注意下啦,模块的名字要以@符号开始、/符号结束,中间部分为私有包的组织名。例如,@may/logger,may 为组织的名称,logger 为包名。
{
  "name": "@may/logger"
}
发布模块
:::info
进入项目根目录,输入命令。
:::
npm publish常见问题
问题 1
:::warning
no_perms Private mode enable, only admin can publish this module: coorddistance
:::
国内网络问题,把 npm 的镜像代理到淘宝或者别的地方了,这里要设置回原来的镜像。
问题 2
:::warning
Unexpected end of input at 1:3637 npm ERR! egistry.npmjs.org/mkdirp/-/mkdirp-0.3.2.tgz”},”engines”:{“node”:”*”}
:::
执行命令 npm cache clean –force
问题 3
Node项目部署 私有包报错 404 一般两种情况造成:
- 检查服务器是否登录npm账号
- 执行命令npm config get registry 检查是否指向https,没有指向https执行命令 npm config set registry=https://registry.npmjs.org
:::info
在 Node.js 开发过程中除了万能的 console.log 之外,还有 Node.js 与 Chrome Devtools 结合的调试工具,以后可以选择使用浏览器来调试 Node.js 应用程序了。
:::
启动调试器
创建测试代码
const fs = require('fs');
const path = require('path');
const filePath = path.resolve(__dirname, 'hello.txt')

console.log('filePath: ', filePath);

fs.readFile(filePath, (err, res) => {
  console.log(err, res.toString());
});
运行带有 –inspect-brk 标志的 node
启动时在 node 后面加上 –inspect-brk 标志,Node.js 将监听调试客户端,默认情况下监听在 127.0.0.1:9229 地址,也可以显示指定地址 –inspect-brk=host:port
$ node --inspect-brk app.js
Debugger listening on ws://127.0.0.1:9229/c7a51e5a-d9be-4506-83fb-0a9340d2b9ba
For help, see: https://nodejs.org/en/docs/inspector
:::warning
注意 node –inspect 与 node –inspect-brk 的区别:
–inspect 不会终断
–inspect-brk 在用户代码启动之前会终断,也就是 代码在第一行就会暂停执行。
:::
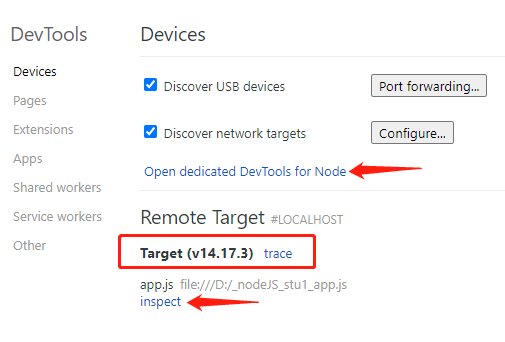
Chrome 打开
浏览器地址栏输入 **chrome://inspect/** 按回车键
Remote Target 下展示了当前运行的 Node.js 版本号,打开 inspect 或 Open dedicated Devtools for Node 链接,如下所示:
断点调试
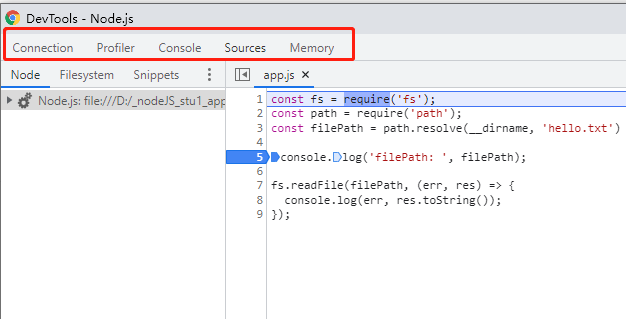
窗口介绍

- Connection:链接
- Console:控制台
- Sources:源代码调试(本节主要讲的)
- Memory:内存,查找影响性能的内存问题,包括内存泄漏、内存膨胀和频繁的垃圾回收
- Profiler:性能

- Resume script execution(F8): 恢复脚本执行,每一次都会自动执行到断点处。
- Step over next function call(F10):跳过下一个函数调用,执行当前代码行,在当前代码行的下一行处停止,是一步一步的操作。
- Step into next function call(F11):单步进入下一个函数调用。
- Step out next function call(F11):单步退出下一个函数调用。
- Step(F9):执行当前代码行并在下一行处停止。
设置断点
在 Source 选项卡下,找到 app.js 这是我们测试脚本的入口文件,如果是执行的 –inspect-brk 标志,默认会停留在代码第一行处。
第一种设置断点的方式,是在程序里加入 debugger 命令。
第二种设置断点的方式是在编辑器窗口中单击要设置的代码行,此时编辑器窗口中该行会处于被选中状态,还有一个右侧的小箭头。另外右下方 Breakpoints 面板中也展示出了我们设置的断点。
对已启动程序调试
:::info
如果一个 Node.js 进程启动时没有加 –inspect-brk 标志,但是我们又不想重启进程来调试,这个时候怎么办?以下两种方式任何一种都可以:
:::
方式一:process._debugProcess(PID)
找到当前启动的 Node 进程 ID,之后使用 node -e ‘process._debugProcess(26853)’ 会建立进程 26853 与调试工具的链接。
$ ps ax | grep app.js
26864 s001  S+     0:00.01 grep app.js
26853 s002  S+     0:00.09 node app.js

$ node -e 'process._debugProcess(26853)'
SIGUSR1
方式二:SIGUSR1 信号
向 Node 进程发送 SIGUSR1 信号,也可以建立与调试工具的链接。**在 Windows 上不可用**,还需要注意版本,在 Node.js Version 8 或更高版本中将激活 Inspect API。
$ kill -SIGUSR1 26853本博客所有文章除特别声明外,均采用 CC BY-SA 4.0 协议 ,转载请注明出处!